Developer Mojang has helped streamline the entire effort so even new players can enjoy their own game worlds.
Step 1: Starting Off
Setting up a server is completely free, and does not require any equipment on your end, besides your computer, obviously. Having Windows is probably the safest and easiest bet, though.
To start, take a little trip over the official Minecraft website. Click “download it here” underneath Steve. Within this specific download page, the option to download the Minecraft Server Program will be made available. This is exactly what you want to look for.
Step 2: Get The Icons
Upon completion, Minecraft Server will appear on your desktop. It is this icon that you want to double click, which will enable two more game icons to appear.
Double click on the EULA icon, then head to the bottom sentence, which reads “eula=false” and switch that false to a true, then wait a couple of seconds. More icons should appear now.
Step 3: Locate Your IP
The next step is simple: just find your IP address. Click start, then run, and type in cmd. A black window will appear, it is here that you want to enter “ipconfig” and look for the specific IPv4 address. Write this down so you don’t forget!
Step 4: Editing Server Info
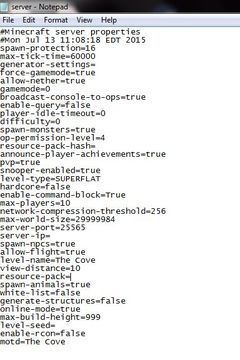
The server is almost all set now that you have your IP address. This is what you will use to connect, as well as other players you allow entrance. You can, however, edit the server info to make things a little easier. The following settings will be made available to the server owner in a Notepad file:
#Minecraft server properties#Mon Jul 13 11:08:18 EDT 2015spawn-protection=Monsters Do not spawn in this radius around the playerallow-nether=Can Players enter the nethergamemode=Survival, Adventure, Creative, Spectatorbroadcast-console-to-ops=Tell when a command is executed to the operatorplayer-idle-timeout=How long a player can not move before they are kickeddifficulty= Peaceful, Easy, etc.op-permission-level=How High An OP’s Permissions areenable-command-block=Can Command blocks workmax-players=10network-compression-threshold=256max-world-size=29999984server-port=Which port on your computer is your server hosted onserver-ip=If your computer has many IPsspawn-npcs=If your game spawns mobslevel-name=Worlds Nameview-distance=Render Distanceonline-mode=Will it Give Everyone their accountmotd=Name on The server screen
Step 5: Play!
Now that your server has been setup, the final step is quite simple: Play the game! Open your Minecraft Server icon, then open Minecraft and head into the multiplayer component. Enter your IP address where it asks and connect.
See, setting up a Minecraft server isn’t too hard. Even I could do it!