You may already be looking into how to reduce waste at home (opens in new tab) or simply wondering how to make your lawn greener (opens in new tab). Composting does both. Better yet, it channels food and garden waste away from landfills, cutting down on the production of methane, a potent greenhouse gas that contributes to global warming. There’s no big cost to learning how to compost at home either. All you’ll need are a few basic gardening tools such as a shovel and gardening gloves, a tub to collect and transfer your food waste, and a composting bin. That’s if you’re not creating your own cost-free compost heap. Once your initial bin or heap is sorted, compost also requires very little upkeep. With the following eight steps, you’ll know how to compost like a pro in no time. In return, you’ll have a rich fertilizer ready to use in your backyard or at the very least, donate to a composting service or green-fingered neighbor. A great swap for chemical fertilizers, which can cause soil more harm than good, compost helps to fight disease in your plants by boosting the microscopic organisms and oxygen in your soil.
What is compost?
Compost refers to organic matter that has been recycled to form a natural fertilizer. Compost is created by combining and turning food waste and yard waste.
When should you compost?
Composting is a year-round activity. However, the best time to compost garden waste is usually between late summer and early winter when trees and plants shed more organic matter.
How to compost in eight easy steps
1. Decide between a composting bin or composting heap
Your first dilemma is choosing between a composting bin (opens in new tab) or a composting heap. A composting bin is very effective at retaining moisture and heat, which can lead to great results. That’s as long as the bin has sufficient drainage holes, air holes and a lid to keep out rain and unfortunate scents. On the flip side, a composting heap requires more space (approximately three square meters should do). As the compost will be out in the open, you can expect a stronger scent and a more unpleasant appearance. The food waste may attract rodents, so you’ll need to set up mesh fencing to keep out unwanted visitors. A little more maintenance is required too, including scattering twigs and straws to keep the area well-drained and oxygenated.
2. Select a site for your compost
The bacteria and fungi that do all the composting for you are fond of shady and steady conditions. That means you should select a dirt or grass spot that’s at least partly shaded and protected from extremes, such as excess moisture or heat. Avoiding low ground and ditches is key, because water will collect there. A composting location should also be a short stroll from your home to make shifting food waste from your kitchen to your compost less bothersome. That’s unless you’re creating an open composting heap. In that case, you may prefer to sacrifice the extra steps in order to keep the smell far away from your home. A composting bin, on the other hand, will only need a site with sufficient space for the lid to open and close.
3. Create a base for your compost
If you’re using a compost bin, you should add a thin layer of soil to the base before adding your waste. A composting heap doesn’t need a base layer because the moisture drains directly into the earth.
4. Source your composting materials
Before you start building your compost, you need to be clear on what can and cannot be composted. Compostable kitchen waste includes fruit and vegetable scraps, egg shells, loose tea or tea bags, bread, grains and pasta. You should avoid dairy, meat, bones and butter or oil. Suitable garden waste for composting includes green matter such as grass and weeds or brown matter such as prunings, hedge clippings, woodchips, leaves, straw and stems. You should steer clear of diseased plants and animal waste, which will both render your compost useless. Other items that are safe to compost include paper, newspaper, cardboard, hair, nail clippings, paper bags, matches, toothpicks, and lint. A plastic bin or tupperware fitted with a lid is ideal for collecting your kitchen waste because the lid will keep fruit flies and stenches at bay.
5. Start adding to your compost pile
Building your compost is as simple as tipping in your kitchen and garden waste. The ideal ingredients for healthy compost are around one third of soft green matter (such as grass, fruit, vegetables, and weeds) and two thirds of woody brown matter (such as leaves, straw, cardboard or paper). Striking the right balance is important because carbon-rich brown matter provides food for the fungi and bacteria. The green matter provides nitrogen, also aiding the composting process.
6. Turn your compost
Without sufficient oxygen, the composting process will come to a standstill. You’ll need to keep your compost moist and aerated by taking a garden shovel or pitchfork and folding over the compost every two weeks. Your compost should look and feel slightly damp at all times, so consider adding water using a watering hose if it feels dry.
7. Leave the compost alone
Over-turning your compost can slow down the process. Aside from following the above steps, you should leave your compost alone and let it mature naturally.
8. Check whether your compost is ready
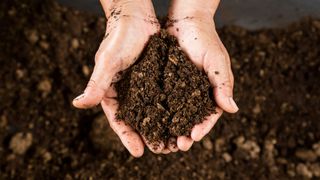
Compost can take anywhere between six months and two years to fully mature. You can tell when it’s ready when the soil, typically dark brown in color, crumbles in your hand. The scent might remind you of a damp woodland. You may find that parts of your compost mature at a quicker rate. If so, simply shovel the mature compost into a container or bag and leave the remainder of the pile to mature.
